 Welcome to Storytelling via Green Screen. This process like any other production work is highly manageable through breaking down each of the steps for yourself and students.
START WITH BASICS of STORY:
- Research topic (gather information on what you’re going to say)
- Draft out script (includes both speech and any movements if any)
- Practice speaking part(s)
- Get as close to the actual scene as possible. Rehearsing while sitting on a couch is not as real if that is not what the end movie shows. This affects voice projection. Use VOICE RECORD PRO app (should be on your ipads as it is one of our “must haves”) to practice voice. This professional grade quality app offers a meter to gage quality of voice to provide immediate feedback.
- Download any other assets (files) you will need to create your video. These can be pictures taken of art work or background elements, other video clips, music or sound clips that you wish. (You may wish to send these through your email or OneDrive so you can download to the ipad Camera Library.)
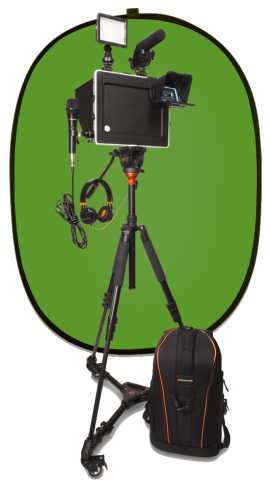
RECORDING STUDIO:
- Set up your green screen area, preferably in a quiet area. You will be using the basic CAMERA APP (not the Green Screen app) as this will produce a better quality recording.
- EQUIPMENT: Click here for video of setup options.
- Anything green or blue on a wall is ok (stay away from shiny materials). The butcher paper in mid/dark green, green coloured paper taped together, tablecloth, bedsheet are all workable. (*Note: Green is a better choice as it is the furthest away from skin colour.) Try to cover a large area from well above the head (eg. top of the whiteboard) down to the floor with a bit of over hang on the floor. This will allow the whole child to be seen rather than cutting off their legs. Smooth out any wrinkles as this will affect the editing production phase of using the chroma key. 😊 You can also use a blue door.
- Use a table, stand or tripod as a stabilizer to rest the ipad. Set the ipad in horizontal view.
- Attach microphone to ipad. If using a hand-held mic, place it close to the speaker.
- EQUIPMENT: Click here for video of setup options.
- Using Green Screen app: CLICK HERE for “how to create a story”.
- (*Tip: start recording a bit earlier and end it a bit later. These lead bits will allow you flexibility during the editing phase.)
- Let student(s) review recording so they can self-assess;
- Re-recordings have better success when individuals identify what they can focus on fixing. This will offer a structural goal to aim towards.
- Save to camera library. Students can also upload to their OneDrive as an added layer of safety. They may also upload to their blogFolios or other portfolio or classblog.
EXAMPLES OF PROJECTS: Click here
Studio Session 1 recording (in Stream – please log into your O365 to view). *These are also in Burnaby Learning Community Team (Tips, Tutorials, ProD > Files)
Studio Session 2 recording– Unfolding Story